
Welcome to the new Traders Laboratory! Please bear with us as we finish the migration over the next few days. If you find any issues, want to leave feedback, get in touch with us, or offer suggestions please post to the Support forum here.


Anonymous
-
Content Count
459 -
Joined
-
Last visited
-
Days Won
1
Posts posted by Anonymous
-
-
........ In any event, to answer your question, yes there certainly are folks on this forum (and that one too, I'm sure) who use VSA in their analyses. We seem to go thru "spurts" of posting, and then folks get tired and take a break.For me, there have been two main reasons for not posting:
1. Up until the last few days, I could not consistantly get onto (find) the site. I was routinely told the site could not be found. This problem does appear to be taken care of. Thanks SoulTrader.
2. As I am not the tread starter, I feel no need to keep the thread going. I do not want to be the only person posting. The more interaction among the community the more willingness I have to post.
I am willing to share my ideas, but they may not always be correct. So I too relish the opportunity to see another trader's point of view on a subject near and dear to my heart.
I have enjoyed the charts from Tasuki and look forward to seeing more.
Shreem, if you post it....... they will come. :o
-
It's gotten so bad, I may have to leave the site for good. I have been trying to get on all day, and only now can connect. No other forum, or site in general, does this.
And it all started after the last update...............
-
You're half right.WRBs do not make good entries. They are good precursors to a good entry point that occurs within the range of the body of a WRB.
WRB's tells you something will soon happen and anything beyond that requires many years of experience with WRBs. Thus, they are a warning sign (precursors) that you should start looking for pattern signals.
 This is key.
Another key element, and one that is a bit more difficult to test, has to do with the creation of the candle (bar) line. That is, Was the WRB created because of a news event? Is the WRB the direct result of an event in its sister market? For example, maybe you are looking at the emini S&P, and you see a WRB at 0830 on Wed. The actual event that caused the WRB was from the Oil market (inventory report).
Even if one does not use VSA, volume is also a key measure. Volume is activity. The more activity on the WRB the more significant is may be. (in the VSA thread I talk about low volume signals in the range of high volume bars). A WRB created with little volume is suspect and should not be traded/treated as one created on extreme volume.
So, as Mark echoed me, I will echo him: Not all WRBs are created equal.
-
I have been watching WRBs for over a month now. In my analysis, the majority of the time they are not a good entry or exit point.You're half right.
WRBs do not make good entries. They are good precursors to a good entry point that occurs within the range of the body of a WRB.
WRBs represent changes or shifts in supply/demand. They are more like guide-posts to what is happening in the underlying dynamics of the market.
To understand why they make good exits, one has to have some understanding of why they make (set -up) good entries.
-
Brilliant analysis, PP. Sorry to backtrack a few posts, but in your post on p. 28 (permalink #278), you show a chart with the words "Squat (test)". What the heck is a "Squat"? Is it the the same as a "test", or is Squat a subset of tests, or are tests a subset of Squats or what? Thanks, TazON SQUATS:
"A squat is the strongest potential money maker of the four Profitunity windows. Virtually all moves end with a squat as the high/low bar plus or minus one bar of the same time period........
The squat is the last battle of the bears and the bulls, with lots of buying and selling but little price movement (NARROW RANGE). There is almost an equal division between the number and enthusiasm of both bear and bulls. A real war is taking place and the equivalent of hand to hand combat is going on in the pits..............", Bill Williams, TRADING CHAOS, p.93.
Bill Williams' technical definition of a squat bar is a bar with greater volume than the previous bar and decreasing MFI (Market Facilitation Index). The short hand definition is, volume greater than the previous bar and a SMALL range than previous bar. As I do not use mathematical formulas, it is the short-hand definition that I look at.
Tom Williams says that the range of a bar tells us the sentiment of the market makers, the ones who can see both sides of the market.
For Volume Spread Analysis the story above is off while the bar itself is of note. VSA would say that the volume is the retail trader rushing into the market. The spread is narrow because as the retail rushes in to buy, for example, there is a substantial amount of Supply from the professional to a meet that demand. Because the market makers see resting orders to sell from the smart money, they have a different perceived value of the stock/index/currency. This perception of value is such that they are willing to keep the spread narrow as they see expect prices to fall. If they, the market makers, were in fact bullish, they would increase the spread, not let retail traders come in and get "good fills".
Simply put, as volume increases the range of the bar should increase as well. If the range is decreasing, something most be going on underneath. What is going on underneath is either Supply swamping Demand or Demand swamping Supply. This often happens at Market tops or bottoms (like Bill said).
We are yet again at situation where we see two different methods coming to the same conclusion. Tom never mentions squat bars, but he talks about narrow spread bars on high volume (p.77 for one-when discussing market tops.)
A squat and a test are not related, but could be the same bar. A test that has a narrower range than the previous bar and has higher volume is by the short hand definition a squat. An UpThrust might also be a squat. Note that at potential turning points as defined by VSA: Tests, UpThrusts, we have the potential for a squat. Which as stated above often come at plus or minus one bar from said turn.
To be sure, not all squats are turning points and not all turning points have a squat. Generally speaking, the higher the volume the more likely the squat will be a market turning point.
-
WOW. Kinda’ weird to look at a thread for the first time and see yourself quoted in the first post. LOL.
The point I was making was that 10 pips/ticks should not be seen as "too small" or not worth the time. Successful traders are not all making 150 pip trades, or three 50 pip trades only per day.
I find it kinda’ funny that people always say "...all the money I could of made today if I kept trading". How come nobody says, "..I would of had 5 more losing trades today if I continued..."? The mind sees what it wants to I guess.
In truth, I do not like profit targets. I like to surrender to the market, to follow it. I take all it is willing to give me. Profit targets are about what I want, not what the market wants. Along those same lines, I do not like the idea of a "dollar per day" approach. BrownsFan is correct. It does put the emphasis on the WRONG day. Rather than being focused on the days when the market trends beyond expectations (or gives multiple trades with larger than average wins), the days that the market chops becomes more important as you struggle to hit an arbitrary figure of x ticks per day.
Again, my point was that if I make a trade and only net 10 pips, I do not want to think "WTF?". I should feel the same as if the trade netted 100 pips. In both situations I planned my trade, surrendered to the market, and traded my plan. These are the true measures of trading success.
-
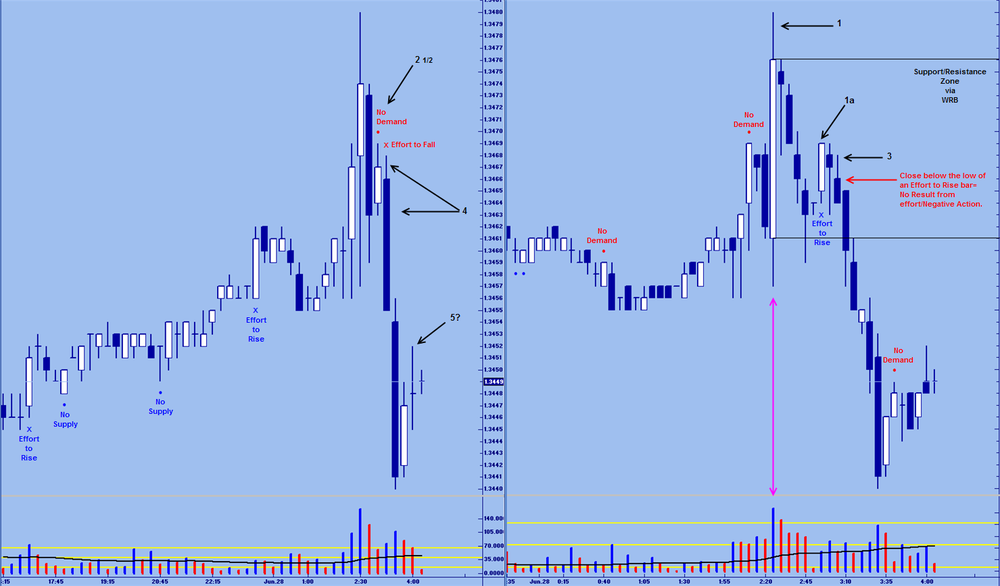
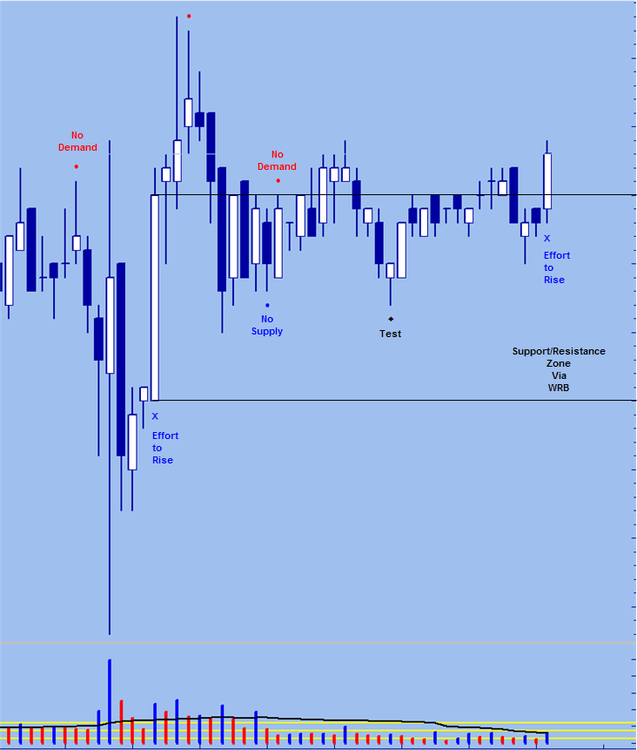
ANOTOMY OF A TRADE SET-UP :
Let's take a look at a nice trade set-up here. Actual profit was around 20 pips, but that is really not the issue. THE ISSUE IS HOW WE VIEW SUPPLY/DEMAND DYNAMICS IN REALTIME & HOW WE TRADE WITH "SIGNS" THAT USE FUTURE BARS (CONFIRMATION BARS).
First turn your attention to the chart on the left. This is a 15 min chart. The first thing to note is an area that is not labeled. In the Middle of the chart is an Effort to rise bar. However, price does not make a higher high and in fact trades lower: No result from an effort to rise/Negative action. This is the first clue of a change in the market.
To be sure, momentum does take the market higher.
Now let's jump over to the right hand chart, the 5 min. #1 is a Wide Spread bar up bar with ultra high volume that closes off its high and the next bar is down. Supply entered the market here.
Note also that this is a WRB and creates a Support/Resistance zone. This is key. We now have a High volume bar that is a WRB. We would love to see a low volume sign within the body of this bar. (we don't get it).
Price does indeed begin to fall from this point as Supply entered the market.
#1a. After the initial down fall we see an Effort to Rise. Please note that effort bars do not need confirmation. Thus at 2:55 at the close of the bar we know we have just seen an effort to rise bar. No reason to get long. Nothing on the 15 would merit it. The next bar(s) do not make a higher high. We are thus starting to see No Result on the very Next bar as it does not make a higher high.
#2 1/2 we jump back over to the 15 min char. We get an up bar with a narrow range an volume less than the previous two bars.THIS IS THE BASE DEFINITION OF NO DEMAND. This bar closes at 3:00. Now, for confirmation, we will need to wait until the close of the 3:15 bar.
My software will place the sign on the bar at the close of its period and keep it there as long as the criteria remain met. Thus at the close at 3:00 a red dot actually appears. It would disappear if the next bar makes a higher high and not return. It would also disappear if the current price is equal to or greater than the close of the previous bar. But if the current price changes, the dot would come back.
But let's assume the dot does not show up in the first place. We know we have just seen the base definition of No Demand.
At 3:05, we see a bar that closes equal to the Effort to Rise bar. This is NO RESULT FROM AN EFFORT TO RISE/NEGATIVE ACTION. We would actually like to see this price lower than the low, but the bar prior does trade lower than the effort bar. Simply, we are not seeing support at the low of the effort bar.
In sum:
We have a base definition of No Demand on the 15. We have seen supply enter on a wide spread bar with ultra high volume and we now have no result from an effort to rise: GET SHORT on 5 min.
#5 This bar confirms the No Demand bar. At its close the x appears and the dot is there for good. So, if we assume only appears at the end of the next bar, then it would appear now at the same time the x appears. BUT WE ARE ALREADY SHORT BECAUSE WE KNOW THE BAR TO BE NO DEMAND.
Yes the "sign" may come "after the fact" as the detractors say, but since we know how to read the chart, we are already in the trade.

EDIT: almost forgot to mention that the effort to rise bar was within the body of the WRB (hmmm, have I mentioned that before?).
-
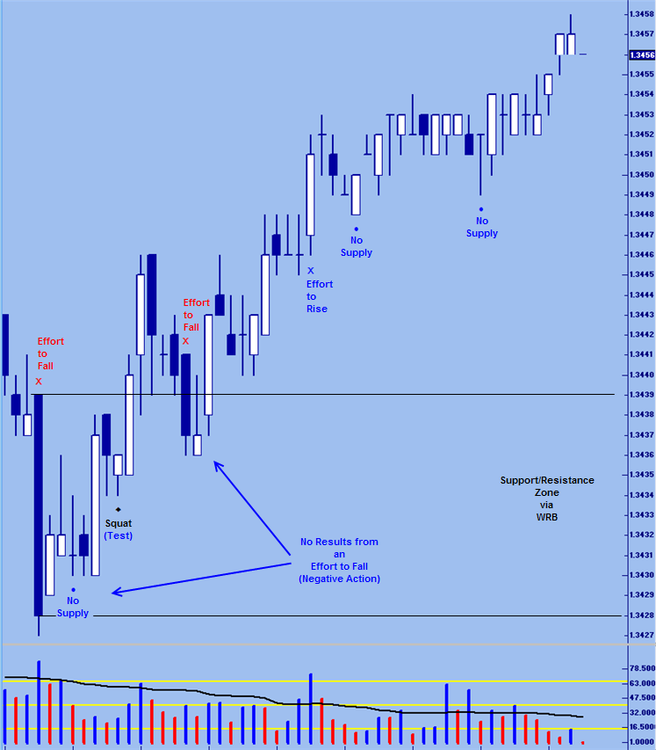
Hi PPWhy you don't mention the candle after the squat as an effort to rise? The close was outside of the WRB's s/r zone with higher volume then the previous four bars. In addition, the boddy of this candle acted then itself as s/r zone, followed by another effort to rise bar after the second "no result from an effort to fall". In an overall view, after the first effort to fall candle, I see more effort to rise then effort to fall.
Your definition of an "effort" bar differs from mine. I do believe we come to the same conclusion: more strength than weakness. Remember, No result from effort to fall/Negative Action can be as strong a sign of strength as an effort to rise bar with good rusults.
Hi PivotProfile,interesting read. I am not familiar with metastock, so i have a question. Does C>ref(C,+1) look one bar in the future?
If yes then your
NoDemand:=If(H>ref(H,-1) and L>=ref(L,-1) and (H-L)<=ref((H-L),-1) and V<ref(V,-1) and V<ref(V,-2) and C>ref(C,+1) and H>=ref(H,+1),1,0);
should look in tradestation like
condition1= H[1]>H[2] and L[1]>=L[2] and Range[1]<= Range[2] and V[1]<V[2] and V[2]<V[3] and C[1]>C and H[1]>=H;
if condition1 then
plot1(1);
Yes it does look one bar into the future. See next post..........
-
......... What I am suggesting is that it is valuable to free your eyes from the "tyranny of the timeframe" and look at the "ebb and flow" of the market. Good call, you guys.Nice.
Here is an great example of seeing strength in a market thru the "ebb and flow".
While this is a hindsight example, one can ask him or her self, "what would I do on the last bar of the chart?"
Take a look at what we have here. The first thing to note is that we have two Effort to Fall bars with no results. In fact, price never trades lower than the low of either effort bar. This is negative action. Negative action is basically the opposite of what we would expect to see happen. In other words, after a sign of weakness, we expect lower prices. Negatively, we see higher prices.
In this case negative action means strength.
We also see a Test and multiple No Supply bars. As the market unfolds, the ebb and flow shows a market that wants to go up. AT NO TIME IS THERE A REASON TO BE A SELLER.
To the question: While there does appear to be a little volume/price divergence, VSA is telling us the market is strong and the path of least resistance at this point, remains up. Therefore, we may not be buyers here, but we are certainly not sellers...........
-
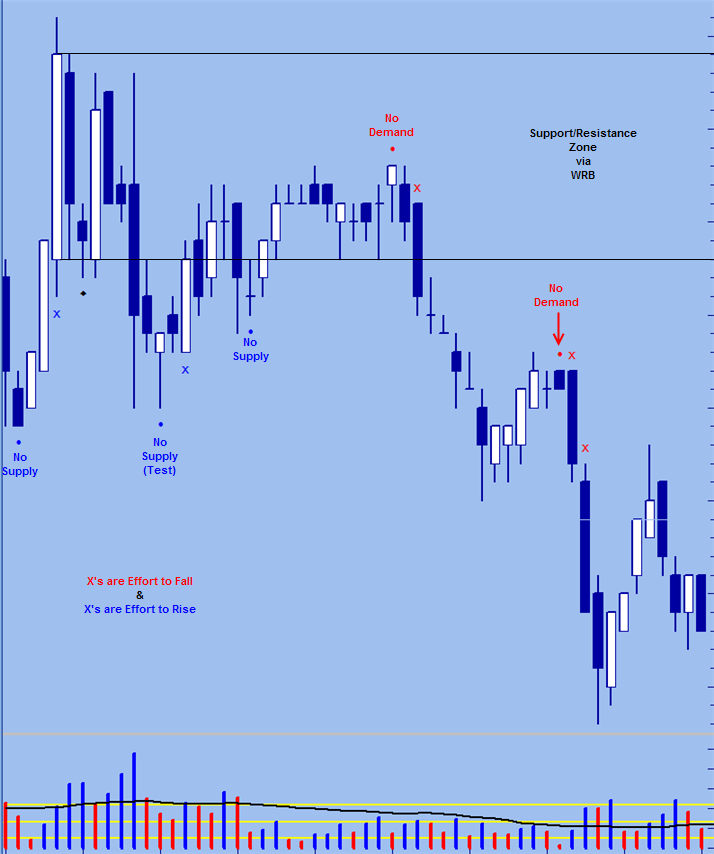
The story continues........
Here is more on the underlying story. I have noticed that very often after a No Demand/No Supply (or low volume in general), 1-3 bars later we see an Effort bar.
Let's examine the story.
No Demand means there is little to no activity by the Professional Money. For practical purposes, we will define Professional Money as those traders who trade with enough size to actual effect market change by creating imbalances in supply and demand.
Now if the Professional Money is not buying as prices rise, then the must expect that prices are poised to fall.
If they expect price to fall, one should not be surprised to see a bar in the down direction where volume picks ups as they try (effort) to take price in their desired ( or expected) direction. This is shows up as an Effort to Fall bar.
Individually, neither bar is defined by the other. That is to say, they are independently defined. Hence their propensity to occur around each other gives more insight into the validity of the story they purport to tell.
Note that the chart also tells the opposite and as telling situation: a No Demand in the range of an Effort to Rise bar. As there was an effort to take price higher, price moved down. It begins to move back up. However, there is no longer any interest in higher prices. Since we are in the range or area where Bulls rushed in, we would expect more bulls to rush in. Or at least the same bulls to exert more force (effort). By NOT seeing this, we can see underlying weakness in the market.
Story is the "why". Story coupled with repetition allows us to see things as being more than mere coincidence. Story gets us thru the down draws. All those traders looking for the "Grail" , might first start out by finding a story they can believe in. It wont take away the losses, but it makes them more palatable.
-
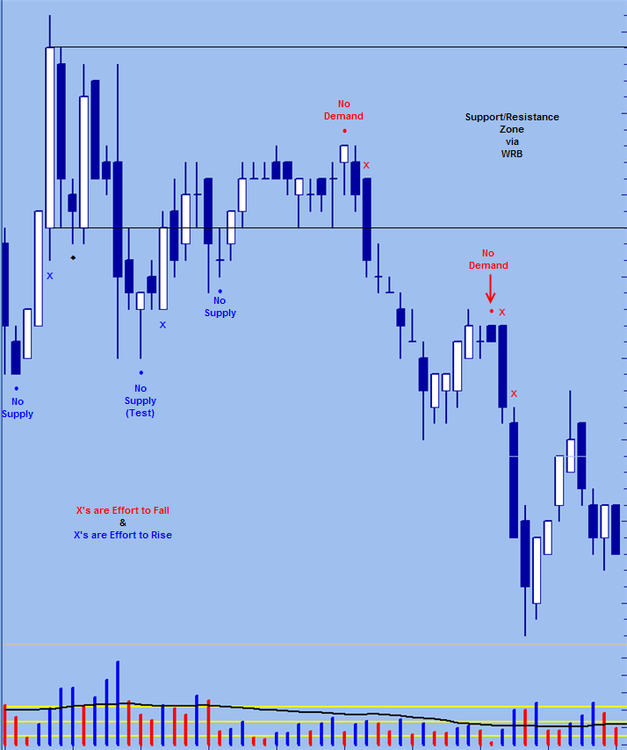
See attached 15 minute ES chart. I'm not sure what the proper definition of "upthrust" is, but I show [at vertical dotted magenta lines] what I consder to be two types of upthrusts--one that ends on the high, and one that ends on the low. In both cases, the highs of the bar were the highs of that pivot cycle, and prices dropped significantly afterwards. In both cases, the highs of the bar pierced the resistance formed by the previous bars. In both cases, the volume was higher than previous bars, but still below the average volume (represented by the yellow line of the 50 period moving average of volume). My thinking is that the volume is just enough to get the retail traders excited, and sucker them into going long at just exactly the wrong time, but not so high that the pros are throwing alot of money at this game of deception.Comments welcome.
As an added attraction, I'm sure you'll notice some beauiful "No Demand" bars on either side of these Upthrusts.
As it has already been said, the first bar is not an Upthrust. In my way of thinking, it most likely an Effort to Rise bar. As I do not know where the open is I can not be sure. Your comment about No Demand on either side makes it more possible, however.
If this is Effort, then we have No Result from an Effort to Rise/Negative Action. Simply, we see weakness here...... One could short the no demand bar two bars later. (Low volume signal in the range of a High(er) volume bar.
-
No Demand 301
Base Definition:
Narrow range bar closing up with volume less than the previous two (2) bars. p. 32, Master the Markets.
TG (signal):
Narrow range bar closing up with volume less than the previous two(2) bars. The close should be in the middle or low of the bar. p 153, Master the Markets.
Joel Pozen (Signal) No Demand & No Supply:
No Demand: C>ref(C,-1) and V<ref(V,-1) and V<ref(V,-2)
No Dmenad2: C=ref(C,-1) and V<ref(V,-1) and V<ref(V,-2) and ref(C,-1)>ref(C,-2)
No Supply: C<ref(C,-1) and V<ref(V,-1) and V<ref(V,-2)
No Supply2: C=ref(C,-1) and V<ref(V,-1) and V<ref(V,-2) and ref(C,-1)<ref(C,-2)
--Some Observations--
* Joel makes no distinction as to range nor location of the close within that range.
* TG uses some criteria that involves the bar after the potential No Demand bar.
a. This gives fewer "false signals".
* Joel's method also captures some Test bars and other low volume signs like No Buying Pressure
* While there is one definition in TG, they actually have multiple definitions as each one creates a different dialog box in the software.
Pivot Profiler (signals) No Demand and No Supply:
NoDemand:=If(H>ref(H,-1) and L>=ref(L,-1) and (H-L)<=ref((H-L),-1) and V<ref(V,-1) and V<ref(V,-2) and C>ref(C,+1) and H>=ref(H,+1),1,0);
NoSupply:=If(L<ref(L,-1) and H<=ref(H,-1) and (H-L)<=ref((H-L),-1) and V<ref(V,-1) and V<ref(V,-2) and C<ref(C,+1) and L<=ref(L,+1),1,0);
NoDemand2:=If(H>ref(H,-1) and L>=ref(L,-1) and (H-L)>ref((H-L),-1) and C=O and C>ref(C,+1) and H>=ref(H,+1) and V<ref(V,-1) and V<ref(V,-2),1,0);
NoSupply2:=If(L<ref(L,-1) and H<=ref(H,-1) and (H-L)>ref((H-L),-1) and C=O and C<ref(C,+1) and L<=ref(L,+1) and V<ref(V,-1) and V<ref(V,-2),1,0);
NoDemand3:=If(H>ref(H,-1) and L>=ref(L,-1) and (H-L)>ref((H-L),-1) and C=H and C>ref(C,+1) and H>=ref(H,+1) and V<ref(V,-1) and V<ref(V,-2) and NoDemand2=0,1,0);
NoSupply3:=If(L<ref(L,-1) and H<=ref(H,-1) and (H-L)>ref((H-L),-1) and C=L and C<ref(C,+1) and L<=ref(L,+1) and V<ref(V,-1) and V<ref(V,-2) and NoSupply2=0,1,0);
NoDemand4:=If(H>ref(H,-1) and L>=ref(L,-1) and (H-L)>ref((H-L),-1) and C=((H-L)*0.5)+L and C>ref(C,+1) and H>=ref(H,+1) and V<ref(V,-1) and V<ref(V,-2) and NoDemand2=0,1,0);
NoSupply4:=If(L<ref(L,-1) and H<=ref(H,-1) and (H-L)>ref((H-L),-1) and C=((H-L)*0.5)+L and C<ref(C,+1) and L<=ref(L,+1) and V<ref(V,-1) and V<ref(V,-2) and NoSupply2=0,1,0);
NoDemand5:=If(H>ref(H,-1) and L>=ref(L,-1) and (H-L)>ref((H-L),-1) and C=L and C>ref(C,+1) and H>=ref(H,+1) and V<ref(V,-1) and V<ref(V,-2) and NoDemand2=0,1,0);
NoSupply5:=If(L<ref(L,-1) and H<=ref(H,-1) and (H-L)>ref((H-L),-1) and C=H and C<ref(C,+1) and L<=ref(L,+1) and V<ref(V,-1) and V<ref(V,-2) and NoSupply2=0,1,0);
NoDemand6:=If(C>ref(C,-1) and (H-L)<ref((H-L),-1) and C>ref(C,+1) and H>=ref(H,+1) and V<ref(V,-1) and V<ref(V,-2) and NoDemand=0,1,0);
NoSupply6:=If(C<ref(C,-1) and (H-L)<ref((H-L),-1) and C<ref(C,+1) and L<=ref(L,+1) and V<ref(V,-1) and V<ref(V,-2) and NoSupply=0,1,0);
NoDemand7:=If(C>ref(C,-1) and (H-L)=ref((H-L),-1) and C=O and C>ref(C,+1) and H>=ref(H,+1) and V<ref(V,-1) and V<ref(V,-2) and NoDemand=0,1,0);
NoSupply7:=If(C<ref(C,-1) and (H-L)=ref((H-L),-1) and C=O and C<ref(C,+1) and L<=ref(L,+1) and V<ref(V,-1) and V<ref(V,-2) and NoSupply=0,1,0);
NoDemand8:=If(C>ref(C,-1) and (H-L)=ref((H-L),-1) and C=H and C<>O and C>ref(C,+1) and H>=ref(H,+1) and V<ref(V,-1) and V<ref(V,-2) and NoDemand=0,1,0);
NoSupply8:=If(C<ref(C,-1) and (H-L)=ref((H-L),-1) and C=L and C<>O and C<ref(C,+1) and L<=ref(L,+1) and V<ref(V,-1) and V<ref(V,-2) and NoSupply=0,1,0);
NoDemand9:=If(C>ref(C,-1) and (H-L)=ref((H-L),-1) and C=((H-L)*0.5)+L and C<>O and C>ref(C,+1) and H>=ref(H,+1) and V<ref(V,-1) and V<ref(V,-2) and NoDemand=0,1,0);
NoSupply9:=If(C<ref(C,-1) and (H-L)=ref((H-L),-1) and C=((H-L)*0.5)+L and C<>O and C<ref(C,+1) and L<=ref(L,+1) and V<ref(V,-1) and V<ref(V,-2) and NoSupply=0,1,0);
NoDemand10:=If(C>ref(C,-1) and (H-L)=ref((H-L),-1) and C=L and C<>O and C>ref(C,+1) and H>=ref(H,+1) and V<ref(V,-1) and V<ref(V,-2) and NoDemand=0,1,0);
NoSupply10:=If(C<ref(C,-1) and (H-L)=ref((H-L),-1) and C=H and C<>O and C<ref(C,+1) and L<=ref(L,+1) and V<ref(V,-1) and V<ref(V,-2) and NoSupply=0,1,0);
NoDemand11:=If(C=ref(C,-1) and (H-L)<ref((H-L),-1) and C=O and C>ref(C,+1) and H>=ref(H,+1) and V<ref(V,-1) and V<ref(V,-2) and NoDemand=0,1,0);
NoSupply11:=If(C=ref(C,-1) and (H-L)<ref((H-L),-1) and C=O and C<ref(C,+1) and L<=ref(L,+1) and V<ref(V,-1) and V<ref(V,-2) and NoSupply=0,1,0);
NoDemand12:=If(C=ref(C,-1) and (H-L)<ref((H-L),-1) and C=H and C<>O and C>ref(C,+1) and H>=ref(H,+1) and V<ref(V,-1) and V<ref(V,-2) and NoDemand=0,1,0);
NoSupply12:=If(C=ref(C,-1) and (H-L)<ref((H-L),-1) and C=L and C<>O and C<ref(C,+1) and L<=ref(L,+1) and V<ref(V,-1) and V<ref(V,-2) and NoSupply=0,1,0);
NoDemand13:=If(C=ref(C,-1) and (H-L)<ref((H-L),-1) and C=((H-L)*0.5)+L and C<>O and C>ref(C,+1) and H>=ref(H,+1) and V<ref(V,-1) and V<ref(V,-2) and NoDemand=0,1,0);
NoSupply13:=If(C=ref(C,-1) and (H-L)<ref((H-L),-1) and C=((H-L)*0.5)+L and C<>O and C<ref(C,+1) and L<=ref(L,+1) and V<ref(V,-1) and V<ref(V,-2) and NoSupply=0,1,0);
NoDemand14:=If(C=ref(C,-1) and (H-L)<ref((H-L),-1) and C=L and C<>O and C>ref(C,+1) and H>=ref(H,+1) and V<ref(V,-1) and V<ref(V,-2) and NoDemand=0,1,0);
NoSupply14:=If(C=ref(C,-1) and (H-L)<ref((H-L),-1) and C=H and C<>O and C<ref(C,+1) and L<=ref(L,+1) and V<ref(V,-1) and V<ref(V,-2) and NoSupply=0,1,0);
NoDemand15:=If(H>ref(H,-1) and L>=ref(L,-1) and (H-L)<=ref((H-L),-1) and C>=ref(C,-1) and C=O and C=ref(C,+1) and C>ref(C,+2) and H>=ref(H,+1) and H>=ref(H,+2) and V<ref(V,-1) and V<ref(V,-2),1,0);
NoSupply15:=If(L<ref(L,-1) and H<=ref(H,-1) and (H-L)<=ref((H-L),-1) and C<=ref(C,-1) and C=O and C=ref(C,+1) and C<ref(C,+2) and L<=ref(L,+1) and L<=ref(L,+2) and V<ref(V,-1) and V<ref(V,-2),1,0);
NoDemand16:=If(H>ref(H,-1) and L>=ref(L,-1) and (H-L)<=ref((H-L),-1) and C>=ref(C,-1) and C=H and C<>O and C=ref(C,+1) and C>ref(C,+2) and H>=ref(H,+1) and H>=ref(H,+2) and V<ref(V,-1) and V<ref(V,-2),1,0);
NoSupply16:=If(L<ref(L,-1) and H<=ref(H,-1) and (H-L)<=ref((H-L),-1) and C<=ref(C,-1) and C=L and C<>O and C=ref(C,+1) and C<ref(C,+2) and L<=ref(L,+1) and L<=ref(L,+2) and V<ref(V,-1) and V<ref(V,-2),1,0);
NoDemand17:=If(H>ref(H,-1) and L>=ref(L,-1) and (H-L)<=ref((H-L),-1) and C>=ref(C,-1) and C=((H-L)*0.5)+L and C<>O and C=ref(C,+1) and C>ref(C,+2) and H>=ref(H,+1) and H>=ref(H,+2) and V<ref(V,-1) and V<ref(V,-2),1,0);
NoSupply17:=If(L<ref(L,-1) and H<=ref(H,-1) and (H-L)<=ref((H-L),-1) and C<=ref(C,-1) and C=((H-L)*0.5)+L and C<>O and C=ref(C,+1) and C<ref(C,+2) and L<=ref(L,+1) and L<=ref(L,+2) and V<ref(V,-1) and V<ref(V,-2),1,0);
NoDemand18:=If(H>ref(H,-1) and L>=ref(L,-1) and (H-L)<=ref((H-L),-1) and C>=ref(C,-1) and C=L and C<>O and C=ref(C,+1) and C>ref(C,+2) and H>=ref(H,+1) and H>=ref(H,+2) and V<ref(V,-1) and V<ref(V,-2),1,0);
NoSupply18:=If(L<ref(L,-1) and H<=ref(H,-1) and (H-L)<=ref((H-L),-1) and C<=ref(C,-1) and C=H and C<>O and C=ref(C,+1) and C<ref(C,+2) and L<=ref(L,+1) and L<=ref(L,+2) and V<ref(V,-1) and V<ref(V,-2),1,0);
NoDemand19:=If(H>ref(H,-1) and L>=ref(L,-1) and C=O and C>ref(C,+1) and H>=ref(H,+1) and V=ref(V,-1) and V<ref(V,-2),1,0);
NoSupply19:=If(L<ref(L,-1) and H<=ref(H,-1) and C=O and C<ref(C,+1) and L<=ref(L,+1) and V=ref(V,-1) and V<ref(V,-2),1,0);
NoDemand20:=If(H>ref(H,-1) and L>=ref(L,-1) and (H-L)<=ref((H-L),-1) and C=H and C<>O and C>ref(C,+1) and H>=ref(H,+1) and V=ref(V,-1) and V<ref(V,-2),1,0);
NoSupply20:=If(L<ref(L,-1) and H<=ref(H,-1) and (H-L)<=ref((H-L),-1) and C=L and C<>O and C<ref(C,+1) and L<=ref(L,+1) and V=ref(V,-1) and V<ref(V,-2),1,0);
NoDemand21:=If(H>ref(H,-1) and L>=ref(L,-1) and (H-L)<=ref((H-L),-1) and C=((H-L)*0.5)+L and C<>O and C>ref(C,+1) and H>=ref(H,+1) and V=ref(V,-1) and V<ref(V,-2),1,0);
NoSupply21:=If(L<ref(L,-1) and H<=ref(H,-1) and (H-L)<=ref((H-L),-1) and C=((H-L)*0.5)+L and C<>O and C<ref(C,+1) and L<=ref(L,+1) and V=ref(V,-1) and V<ref(V,-2),1,0);
NoDemand22:=If(H>ref(H,-1) and L>=ref(L,-1) and (H-L)<=ref((H-L),-1) and C=L and C<>O and C>ref(C,+1) and H>=ref(H,+1) and V=ref(V,-1) and V<ref(V,-2),1,0);
NoSupply22:=If(L<ref(L,-1) and H<=ref(H,-1) and (H-L)<=ref((H-L),-1) and C=H and C<>O and C<ref(C,+1) and L<=ref(L,+1) and V=ref(V,-1) and V<ref(V,-2),1,0);
NoDemand23:=If(H>ref(H,-1) and L>=ref(L,-1) and C=O and C>ref(C,+1) and H>=ref(H,+1) and V<ref(V,-1) and V=ref(V,-2),1,0);
NoSupply23:=If(L<ref(L,-1) and H<=ref(H,-1) and C=O and C<ref(C,+1) and L<=ref(L,+1) and V<ref(V,-1) and V=ref(V,-2),1,0);
NoDemand24:=If(H>ref(H,-1) and L>=ref(L,-1) and (H-L)<=ref((H-L),-1) and C=H and C<>O and C>ref(C,+1) and H>=ref(H,+1) and V<ref(V,-1) and V=ref(V,-2),1,0);
NoSupply24:=If(L<ref(L,-1) and H<=ref(H,-1) and (H-L)<=ref((H-L),-1) and C=L and C<>O and C<ref(C,+1) and L<=ref(L,+1) and V<ref(V,-1) and V=ref(V,-2),1,0);
NoDemand25:=If(H>ref(H,-1) and L>=ref(L,-1) and (H-L)<=ref((H-L),-1) and C=((H-L)*0.5)+L and C<>O and C>ref(C,+1) and H>=ref(H,+1) and V<ref(V,-1) and V=ref(V,-2),1,0);
NoSupply25:=If(L<ref(L,-1) and H<=ref(H,-1) and (H-L)<=ref((H-L),-1) and C=((H-L)*0.5)+L and C<>O and C<ref(C,+1) and L<=ref(L,+1) and V<ref(V,-1) and V=ref(V,-2),1,0);
NoDemand26:=If(H>ref(H,-1) and L>=ref(L,-1) and (H-L)<=ref((H-L),-1) and C=L and C<>O and C>ref(C,+1) and H>=ref(H,+1) and V<ref(V,-1) and V=ref(V,-2),1,0);
NoSupply26:=If(L<ref(L,-1) and H<=ref(H,-1) and (H-L)<=ref((H-L),-1) and C=H and C<>O and C<ref(C,+1) and L<=ref(L,+1) and V<ref(V,-1) and V=ref(V,-2),1,0);
NoDemand27:=If(H>ref(H,-1) and L>=ref(L,-1) and C=O and C>ref(C,+1) and H>=ref(H,+1) and V=ref(V,-1) and V=ref(V,-2),1,0);
NoSupply27:=If(L<ref(L,-1) and H<=ref(H,-1) and C=O and C<ref(C,+1) and L<=ref(L,+1) and V=ref(V,-1) and V=ref(V,-2),1,0);
NoDemand28:=If(H>ref(H,-1) and L>=ref(L,-1) and (H-L)<=ref((H-L),-1) and C=H and C<>O and C>ref(C,+1) and H>=ref(H,+1) and V=ref(V,-1) and V=ref(V,-2),1,0);
NoSupply28:=If(L<ref(L,-1) and H<=ref(H,-1) and (H-L)<=ref((H-L),-1) and C=L and C<>O and C<ref(C,+1) and L<=ref(L,+1) and V=ref(V,-1) and V=ref(V,-2),1,0);
NoDemand29:=If(H>ref(H,-1) and L>=ref(L,-1) and (H-L)<=ref((H-L),-1) and C=((H-L)*0.5)+L and C<>O and C>ref(C,+1) and H>=ref(H,+1) and V=ref(V,-1) and V=ref(V,-2),1,0);
NoSupply29:=If(L<ref(L,-1) and H<=ref(H,-1) and (H-L)<=ref((H-L),-1) and C=((H-L)*0.5)+L and C<>O and C<ref(C,+1) and L<=ref(L,+1) and V=ref(V,-1) and V=ref(V,-2),1,0);
NoDemand30:=If(H>ref(H,-1) and L>=ref(L,-1) and (H-L)<=ref((H-L),-1) and C=L and C<>O and C>ref(C,+1) and H>=ref(H,+1) and V=ref(V,-1) and V=ref(V,-2),1,0);
NoSupply30:=If(L<ref(L,-1) and H<=ref(H,-1) and (H-L)<=ref((H-L),-1) and C=H and C<>O and C<ref(C,+1) and L<=ref(L,+1) and V=ref(V,-1) and V=ref(V,-2),1,0);
-I wanted to place myself between TG and Joel. That is, I wanted more than Signs than TG but fewer and better placed signs than Joel.
-I have used confirmation bars, but any low volume bar, especially a buying bar (or selling bar for no supply), gets my attention.
-I have broadened the definition of low volume. I include volume equal to the previous two bars. Volume equal to the previous bar and less than the bar two bars back. And volume less than the previous bar and equal to the bar two bars back.
-Some UpThursts, Tests, No Buying Pressure, and No Selling Pressure bars are picked up as well. Thus, being able to READ the chart remains an essential element of success.
-It bares repeating, these are not simply buy/sell signals in and of themselves. Background information is needed (effort bars, WRBs, WSBs, High Volume bars with the next bar down............)
As VSAers we have to adhere to certain fundamental principles, but we should not let ourselves be boxed-in.
Case in Point:
The "ideal" Test bar will have an equal or lower range, make a lower low than the previous bar, close down and close on its high with volume less than the previous two bars.
NEWS FLASH: This is the definition of a Selling Bar. Thus, while the book doesn't explicitly mention selling bars, they are part of the picture. To call the bar a selling bar belies the actual strength that is contained within it. TG, therefore, may choose not to mention this to avoid confusion.
Take this for what it is worth. Remeber, we are not talking about buy/sell indicators. Understanding the Supply/Demand dynamics is essential. Questions and comments are desired.
-
Shure Pivot... who cares what name we asign to the money...Please answer me this question to this poor left brained man : The core concept of VSA could be volume divergence ? thanks Walter.
Volume Spread Analysis goes far beyond that. Yet divergence does play a role.
First we should define "Bullish and Bearish" volume:
1. Bullish volume is increasing volume on up-moves and decreasing volume on down-moves.
2. Bearish volume is increasing volume on down-moves and decreasing volume on up-moves.
Now we can incorporate the concept of The path of least resistance:
* It takes an increase of buying (demand), on up-days or bars, to force the market up.
* It takes an increase of selling (supply), on down-days or bars , to force the market down.
The appearance of No Demand (low volume) on an up-move, shows little or no buying. Which means, if there is no trading going on in one direction, the path of least resistance is generally in the opposite direction.
The appearance of No Supply (low volume) on a down-move shows little or no selling pressure. Which means, if there is no trading going on in one direction, the path of least resistance is generally in the opposite direction.
-
See attached chart, which is my original 15 minute ES (permalink #252) annoted first by PP (magenta arrows, permalink #257)) and now by me (points A, B and C). The problem I see with both points A and B is that, while they may fit the classical definition of "no demand", the fact is, demand came in with these bars. Ergo, I would like to propose that we (somehow) come up with a new definition of "no demand" that would exclude these false readings which often come in after a selling climax, as Blowfish described (permalink #259). This new definition, however it is forged, should, I suggest, also INCLUDE at least some of the bars highlighted by my cyan downarrows, because they did seem to represent a loss of demand. Perhaps a simple addition to the standard criteria of "no demand" would be sufficient--they must appear after a buying climax, not a selling climax. Perhaps that's too obvious to mention? Perhaps there should be some either/or provision, such that a widespread bar must close near the low, while a bar that closes above its midpoint must be on lower volume and perhaps also close below the close of the previous bar in order to qualify as representing "no demand". I'm looking at my second and third downarrows (from the left side)--the second one has a narrow spread but it closes above its midpoint, yet it also closes below the close of the previous bar. Maybe that should qualify as "no demand"? The third bar is a real doozy--it closes on its low and it closes below the close of the previous bar, but it has a wide spread. Maybe that wide spread can be forgiven (not disqualify it from being "no demand") because of its other two points in its favor?Just some ideas to chew over.
* Personally, I would never simply short on a sign of No Demand. I look at the background.
* I accept that a nascent trend may have an erroneous No Demand sign.
A couple things:
1. You can add these volume relationships: V=ref(V,-1) and V=ref(V,-2) ; V=ref(V,-1) and V<ref(V,-2); V<ref(V,-1) and V=ref(V,-2)
Again, the idea behind No Demand is volume. Volume is activity and we are looking for little activity (by the professional traders).
Now let's look at the first two bars you have marked that is between points B and C. These bars are closing DOWN.
No Demand needs to close equal to or up. Or, the bar should be a buying bar.
A buying bar is a bar with a higher high and not a lower low than the previous bar. Think about this bar. The non-lower low shows support for prices, while the new high shows that resistance failed to hold. To many traders (retail) this is a sign of upside strength. New high ground from one bar to the next.
But VSA sees WEAKNESS where others see strength. Hence some element of "Upside strength" needs to exist. That usually is a up close. I add the element of a "buying" bar as well.
In addition to background information, I like to see things happen on the next bar. As stated in a prior post, I like the next bar to close lower and for it not to make a higher high. From this way of thinking, only point C is no demand.......
-
That's a comprehensive over view of no demand PP :-)........Intresting what you have to say about looking at the next bar PP. Often it will be flat or no demand or no supply. Another thing that often hapens if the pause is longer is you will get tests in both directions.cheers.
As I have said, this is a fuzzy area and can turn many people off.
It is my understanding that TG paints the No Demand Sign after the bar after the actual No Demand bar. The sign is simply placed back one bar.
My software will immediately place the No Demand sign if the open of the next bar is lower than the No Demand bar and the bar has not made a higher high. If, however, the bar trades such that the last price is above or equal to the close of the No Demand bar, the sign will disappear. It then re-appears if the bar moves lower. Once a higher high is made, it is gone forever.
But we need to remember what Todd says, "It is not about signs on bars, but rather reading the chart". Once you see an up-bar with a narrow range, closing in the middle, and volume less than the previous two bars, you know you have the technical definition of No Demand. Sign or no sign. That is why Joel Pozen simply places the sign at the close of the bar in question.
I think the confirmation is good however, and in practical use one should be doing both.
Here is an example of a perfect situation to illustrate what I mean.
* At 1000 est. You see a narrow range bar with a middle close on volume less than the previous two bars on the 5 min chart.
* At the same time, you see a narrow range bar that closes in the middle with volume less than the previous two bars on the 15 min chart.
* One could wait for the 5 min to confirm the No Demand bar, by the next bar closing lower and NOT making a higher high.
This would only take you to 1005. The 15 still needs 10 minutes to confirm. But if there is weakness in the background (high volume bars closing up with the next bar down, for example) you have all the evidence you need to take a short on the 5. So one timeframe you are using chart reading skill alone and on the other you are still using chart reading skills but you have also added the confidence that comes from a sign (which is based on a confirmation bar, and therefore not part of the actual definition).
For those who have the book, you also have access to some customer only webinars. There is one with this type of theme in it. In it, they use a daily chart. As it is a daily chart there is not a sign on the bar at the start of the next day, but they point out it is a narrow range bar with volume less than the previous two bars and closing in the middle. This creates the bias for the next day's trading. If this next day meets certain requirements, then the sign will appear at the end of this next day. Now, to some this looks like it is after the fact. But those are the ones that are looking for buy/sell signals and do not want to actually learn how to trade...........
-
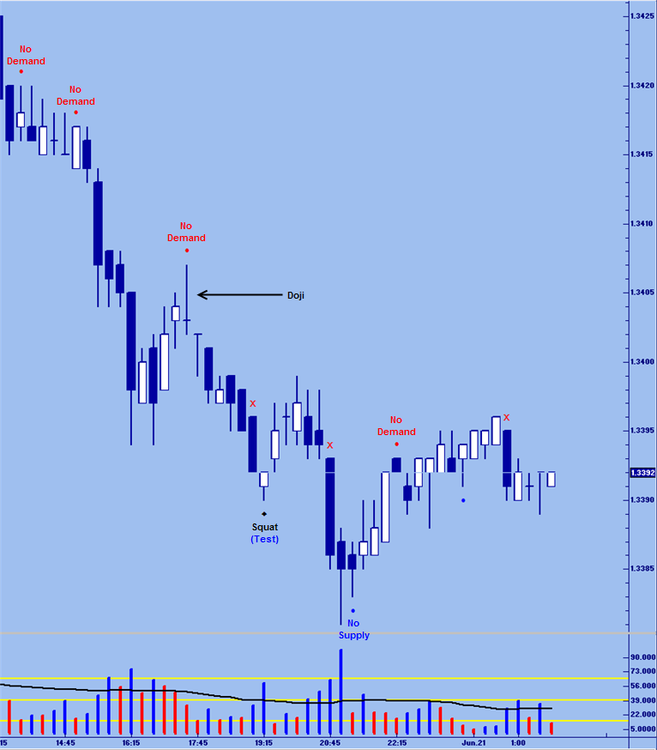
There is a particular type of No Demand that I did not mention before and would like to say a few things on it now.
Check out the attached chart. Notice the No Demand near the middle of the chart. This is an exceptional type of No Demand bar because it is also a Doji. With a Doji I am not concerned with a narrow range. Nor does the close have to be in the high, middle or low.
For candle traders, a Doji is a bar that represents indecision. This goes well with what VSA teaches us. Although it is more lack of interest then indecision-a subtle difference.
Bill Williams talks about certain extreme bars. These bars, as it turns out, are Dojis with closes in the high or low of the range. He states that 95% of the time a market changes direction 1 to 3 bars later after such a bar. As VSAers, we put the missing piece together: volume.
Again, VSA does not technically look at the open. Yet, No Demand bars that are also Dojis are usually very strong signs of weakness. This is one reason I like to look at the open. The other being WRBs.
The astute among you will note that this bar actually closes LOWER than the previous bar. However, it is a buying bar (positional relationship) and thus a No Demand bar.
-
See attached 15 minute ES chart from today and yesterday.Just a short question on "no demand". I seem to see it every time the market starts going up, which can't be right, so if somebody would kindly straighten me out and show me which (if any) of my putative "no demand" bars are the real McCoy, I'd be most grateful. Tx, Taz
Hi. Thank you for posting.
Let's start with the most basic definition of no demand:
An up-bar with a narrower range than the previous bar and volume less than the previous two volume bars.
I have pointed to three such situations.
Now, there are at least two more things to consider that the basic definition does not;
* Price: We would like to see the close in the High, middle or low of the bar. Tradeguider uses only the middle and low in its definition.
* Confirming action: Is the next bar down. This is tricky and a sticking point for some. The next bar down confirms the sign, but again, by definition the sign does not need confirmation from the next bar. TG waits for confirmation before placing a sign on the bar. I too in my signs like to see the next bar close down and have a less than or equal high.
Joel Pozen will paint any bar with volume less than two that closes up or equal (if the bar prior is up from the bar two bars back) as No Demand and will paint it at the close of the bar. Hence one gets a lot of No Demand bars that seem to be "out of place". Also one gets No Demand bars on bars that have greater ranges than the previous bar.
For me, a bar with a greater range than the previous bar needs to have a close in the High, middle, or low not just anywhere on the bar. A close on the high, in the middle, or on the low would actually make the bar "No buying pressure" a form of No Demand but involving larger ranged bars.
A better definition to use as you trade would thus at least include size of the range (narrow) and location of the price within that range ( on the high, in the middle or on the low) with volume less than two bars.
To sum it up:
A bar with a range narrower than the previous bar that closes equal or up on volume less than the previous two bars; and is closing either on the high of its range, the middle of its range or the low of its range.
-
Tasuki;
Nice charts. Thank you for posting. Pleas keep them coming.
First of all, we need to clear up the issue of WRBs. Please remember that WRBs refer to the BODY of the bar: the distance from the open to the close. I see no open on your bars. Strict VSA does not look at the open and in fact usually leave it off of the bars as you do.
What you show there is a WSB (Wide Spread Bar). The spread (range) of the bar is indeed wide, but without an open on the bar we cannot know if it is a WRB.
I mention this as I do not want to confuse yourself and others. WRB analysis, in my opinion, is a natural fit with VSA, but only when you include the open. Tom, however, disregards the open.
Having said that, I really like your charts.
That bar is indeed a WSB with Ultra High Volume. If that bar was selling, then why is the close not on the low? Moreover, why is the next bar up? In fact the large bar is Stopping Volume. Momentum actually takes the market down further where we get a High volume Test/ Shake out.
In truth, based only on this timeframe, one might be looking to go short after the stopping volume. Take a look at the bar two bars later. It is a form of No Demand. Which is why more than one timeframe should be used.
As for your actual question, when we say the market does not like wide spread bars on high or ultra high volume, we mean that the volume may mask hidden selling/buying. To put it another way, if the bar is wide spread up on very high volume, then there can be some selling in the bar. Remember that most people see an up bar with high volume and think the bar is strong. VSA points to the possible weakness (changing supply/demand dynamic) underneath.
P.S. I see you put the 15 min chart in later. Now you have answered part of your own question
 . I really like the 5/15 timeframe combo.
 -
....... The way I interpret Master the Markets the professional traders are a minority only active during accumulation/distribution and upthrusts/downthrusts........Nice.
There are a few key questions a trader needs to be able to answer:
* Why do we have Bull Markets?
* Why do we have Bear Markets?
* Why do markets sometimes trend strongly?
* Why do markets sometimes run sideways?
STRONG HOLDERS
Strong holders are usually those traders who have not allowed themselves to be trapped into a poor trading situation. They are happy with their position, and they will not be shaken out on a sudden down move, or sucked into the market at or near the top. Strong holders are strong because they are trading on the right side of the market.
WEAK HOLDERS
Weak holders are those traders who have allowed themselves to be 'locked-in' as the market moves against them, and are hoping and praying that the market will soon move back to their price level.
These traders are liable to be "shaken-out" on any sudden moves or bad news. Generally, weak holders will find that they are trading on the wrong side of the market, and are therefore immediately under pressure if price turns against them.
* A BULL MARKET occurs when there has been a substantial transfer of stock from Weak holders to Strong holders, generally, at a loss to the weak holders. (accumulation)
* A BEAR MARKET occurs when there has been a substantial transfer of stock from Strong holders to Weak holders, generally, at a profit to the Strong holders. (distribution)
It is about Supply and Demand. Volume represents little more than activity.
Forget about the 85% number. Volume Spread Analysis is not a house of cards built on the foundation of this notion.
What you need to understand is:
A. There is a group of traders that are consistently among the Strong holders. And because of that, they tend to trade with more size.
B. Large-sized Strong holders leave tracks:
-- When Volume is high, it is telling.
-- When volume is low it is still telling; when volume is low, nothing is being done, and that is telling.
C. Even when one attributes large volume to the retail trader (usually Weak holders), one must consider who is taking the other side of the transaction. If it were other retail traders, then 90% of all retail traders wouldn't fail.
There is little doubt that there is a group of traders who are consistently among the Strong Holders. Whether they are syndicate traders, hedge funds, pension funds, or banks matters little.
Whether any single individual amongst the group is always right, matters even less.
-
It can be found on some of the webinars. Unfortuntely, Todd does not do any education session for non software customers. He is the one that is always saying this figure. You are correct, it is not in the book.
He offers no "proof". As I have said, this is the "leap of faith" element in VSA for me. Yet, without this point or exact percentage, the rest of the story makes sense and is can be seen on various timeframes and in various markets.
Simply, don't let that number cloud you from the supply/demand dynamics that VSA points to.
If you look at enough charts, you will see upthrusts, for example. You will see them too much and in the correct places to chalk it up to chance.
-
"In any business where there is money involved and profits to make, there are professionals. We see professional diamond merchants, professional antique and fine are dealers, professional car dealers and professional wine merchants, among many others. All these professionals have one thing in mind; they need to make a profit from a price difference to stay in business.
The financial markets are no different and professional traders are also very active in the stock and commodity markets-these professionals are no less professional than their counterparts in other areas.....
It is important to realize at this stage, that when we refer to the definition of professional, we are NOT talking about the 'professionals' who run investment funds or pensions...........
So what do I mean by a professional trader? Well, one example is the private SYNDICATE trader that work in co-ordinated groups to accumulate (buy), or distribute (sell), huge blocks of stock to make similarly huge profits." Tom Williams, Master the Markets, p.14
Syndicate traders are secret, well-heeled, highly skilled, and happy that you believe (wrongly) what you believe.
-
Hey PP,85% is not such a leap really. Even if you accept this figure the problem remains that at least 35% of those 'professionals' are goig to be wrong! Certainly in futures markets. If you asume that a few 'retail' traders are correct (even if ocasionally) then the percentage is higher.
Not sure where you get your figures from.
Simply, within that 85% comes a percentage of the Smart Money that is wrong.
I really don't care.
What I do not understand, is why you do?
The price bar shows the composite opinion of the Smart Money (winners and the losers.) The winners make up a higher percentage of that whole, so we follow their actions. Smart Money losers do not stay that way for very long. THEY KNOW HOW TO READ A CHART. And can see when the rest of the Smart Money is doing the opposite .
Take a look at a chart. Ask yourself why there are large volume spikes at certain highs and lows. This goes against the general idea of what high volume means: high volume on an up bar MORE buying. High volume on a down bar MORE selling. Now if that were the case, then these areas would not be tops and bottoms to the degree that they are. In other words, something is going on underneath. Thus we need to ask, WHO is taking the other side of these trades? And why does this group seem to be on the right side at the right time?
As you said, this is a zero-sum game. Somebody is on the other side of these high volume trades at tops and bottoms, and we want to follow that group. Call them what you want. Of course, there is much more than trying to pick tops and bottoms going on; or at least if you are doing it right, there should be.
-
A couple of charts......
-
Here are a couple of charts showing how VSA is great with hindsight but not so great in real time trading.I don't think VSA is worthless on a 5 minute chart but I don't think you can point at high volume and say "that's Professional Money!". We really have no idea who or what is behind a volume spike from one 5 minute period to the next. The 5 minute charts are useful if you're looking for the perfect entry but you're getting your directional bias from the 15 minute charts. That's why I think multi timeframing is an important part of VSA.
I don't think it's necessary to try and identify who is behind a volume spike. The important thing is to recognise that reversals occur on high volume around support and resistance areas.
The first thing I see on this chart are two small tops to the left that represent supply. Hence the large candle with Ultra High volume could be "Pushing thru supply". That means the volume is absorption volume as the smart money is willing to buy at higher prices. If they are willing to buy at higher prices, they must expect even higher prices.
As you have said, one timeframe is usually not enough for proper analysis.


[VSA] Volume Spread Analysis Part I
in Volume Spread Analysis
Posted
Nice posts with some good insights. I believe that TG would call these bars (1) Hidden UpThrusts or (2) UpThrusts over two bars.
You are correct about the intent of the bar: trick the herd into a long position just as the market is about to head down.
I hope we can get a response from someone that knows for sure. Something of note: in both cases, when you look at the close of the next bar, it is in the middle of the range of the first bar. Which is why I think it may be a two-bar type sign of weakness.
Background strength/weakness is nothing more than that: what has already occurred up to that point. Supply that enters on a wide spread up bar on ultra high volume does not "disappear" in just three bars. The supply remains a factor for some time to come. Obviously, the more supply, the longer it would effect future prices. Or, the more demand needed in a shorter timeframe.
In essence, just as we are products of choices made yesterday, five months ago, 10 years ago, the market today is the product of both prior Smart Money action as well as present Smart Money action.